Building a state driven app in SwiftUI using state machines
Feb 18, 2020
When developers are working on complex features we often talk about state. Many times we don’t want to deal with state, at least when it’s mutable. State complicates everything, especially when it can change. In this post, we’re going to look at how to deal with state in UIs, specifically iOS applications, but the principles should translate to almost any platform.
I’ve recently written a blog post about state diagrams and collaboration between designers and developers. We’ll be looking at the same sample application in this post. In this post, however, we’re taking a more technical perspective and will be looking at how we can use the state machine to drive UI changes and respond to events. The sample code is also available on GitHub if you want to check it out in more detail.
Sample application
The main concept of our sample application is a search function that can search for images on pixabay. We already have a design spec for our application, it looks like this:

There are five different screens in this UI: the empty start screen, the searching screen, the loading screen, and finally the result screen or the failure screen. The way these screens are laid out in the canvas above tells us something about how they are related to each other. We can already infer quite a bit about the UX and flow of this application by just looking at this canvas. For instance, the transition from the start screen to the searching screen is triggered by the user tapping in the search field. Similarly, the transition from the searching screen to the loading screen is triggered by the user tapping the search button in the bottom right of the keyboard. We see that transitioning to the loading screen will also mean firing a network request to the pixabay API. Since we know that network requests are prone to fail, we also have a failure screen for when that inevitably happens.
But what should happen when the user has reached one of these two “end states” (error or results) and wants to search again? It’s not entirely clear from the sketches, and we see that there is room for a more complete specification here.
State diagrams
To specify our design spec further we are going to use a state diagram. Our notation here will be circled text to represent states, and arrows with text to represent transitions between states, like this:
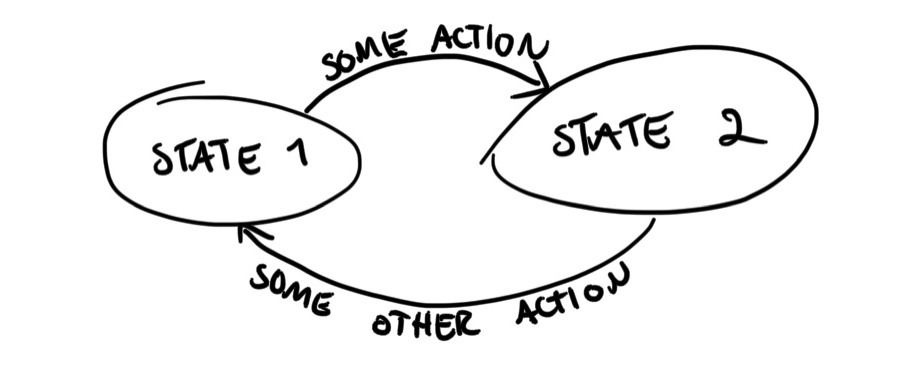
Note that the text next to each arrow is typically an event or action. In this case, we’re dealing with UIs, so a typical action can be a button tap, text field selection, and also external events like a network request returning a result. The state diagram for our sample application looks like this:
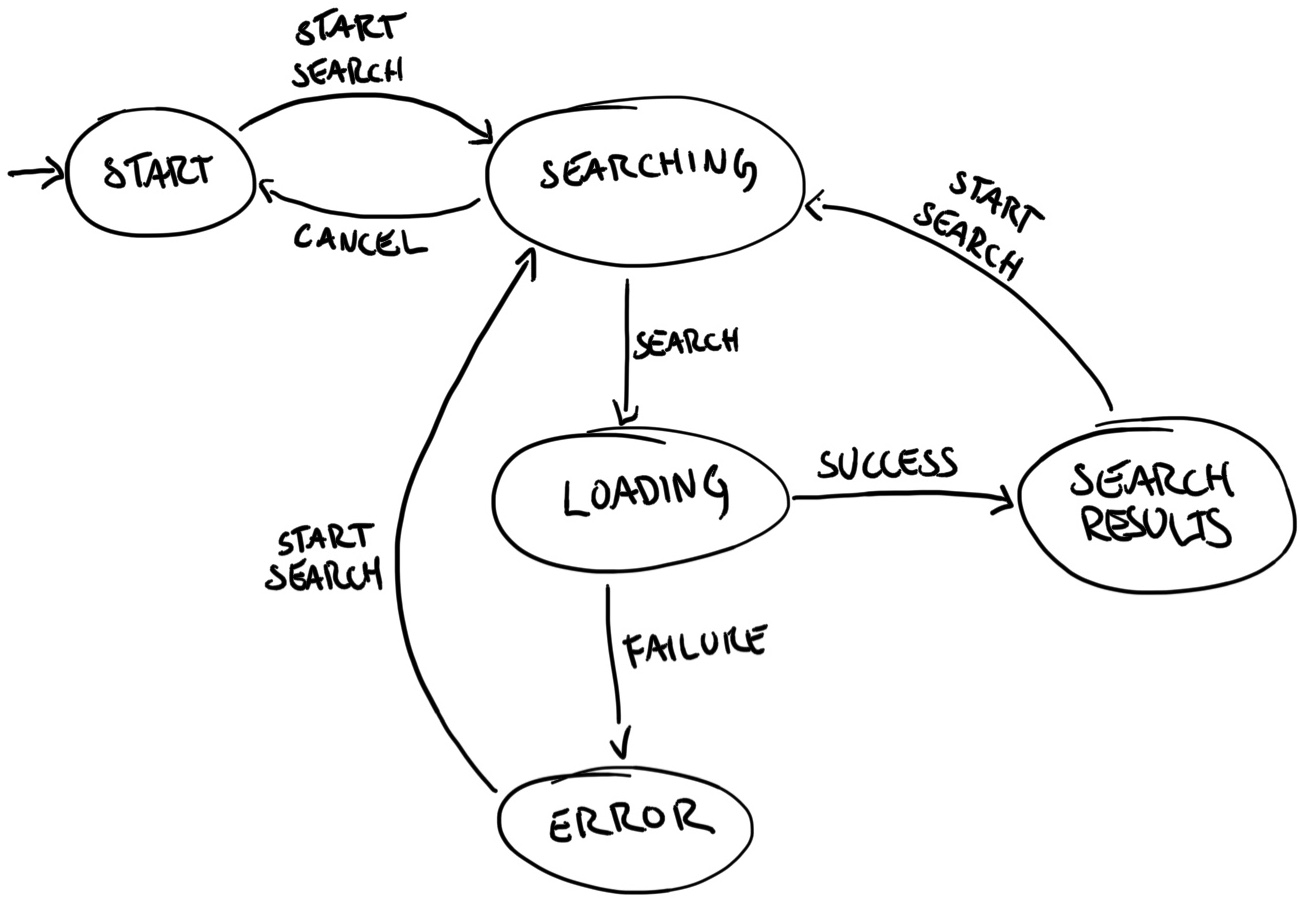
We are defining some actions in our state diagram:
- Start search: the user taps the search text field to give it focus
- Cancel: the user taps the cancel button that appears next to the text field
- Search: the user taps the search button in the keyboard
- Success: the network request to pixabay returned with results
- Failure: the network request to pixabay failed
This gives us a pretty complete picture of how this application is supposed to work, so now we can go over to implementation.
Implementation
Our sample application is implemented in SwiftUI, using the MVVM architecture. The structure of our application is a container view ( ContentView) that encapsulates our application window. This window has a corresponding view model that handles our logic and houses our state handling.
The User interface
The view hierarchy is pretty simple. Everything is wrapped in a NavigationView. The first view inside is a custom component, the SearchBar view, that wraps UIKit's UISearchBar. Below that is the main content of each screen, and that's going to vary with the state of our application.
struct ContentView: View {
  @ObservedObject var viewModel: ContentViewModel

  var body: some View {
    return NavigationView {
      VStack(spacing: 0) {
        SearchBar()
        self.content
        Spacer()
      }
    }
  }

  private var content: some View {
    switch viewModel.state {
    ...
    }
  }
}
To implement our state diagram we’re using a state machine, that defines all the states and events (actions):
class StateMachine {
  enum State {
    case start, searching, loading, searchResults, error
  }
  enum Event {
    case startSearch, cancel, search, success, failure
  }
  ...
}
The state is going to influence both the search bar and the content below. The search bar can trigger events, and its appearance is dependent on the state. We start with the following view model:
class ContentViewModel: ObservableObject {
  private let stateMachine: StateMachine
  private var stateCancellable: AnyCancellable?

  @Published var searchText: String = ""
  @Published var state: StateMachine.State
  @Published var isSearching: Bool = false

  var showSearchCancelButton: Bool {
    return stateMachine.state == .searching
  }

  init(stateMachine: StateMachine) {
    self.stateMachine = stateMachine
    self.state = stateMachine.state
    self.stateCancellable = stateMachine.statePublisher.sink { [weak self] state in
	self?.state = state
    }
  }

  func searchStatusChanged(_ value: SearchBar.Status) {
    ...
  }
}
Note that the view model is acting as a middleware, propagating the changes from the state machine’s state, through it's own published property. We'll get back to why this is a good pattern.
With this view model we can add some state to our search bar:
struct ContentView: View {
  ...
  var body: some View {
    return NavigationView {
      VStack(spacing: 0) {
        SearchBar(
          text: $viewModel.searchText,
          isEditing: $viewModel.isSearching,
          showsCancelButton: viewModel.showSearchCancelButton,
          searchingChanged: viewModel.searchStatusChanged
        )
        ...
      }
   }
}
This adds the following capabilities to the search bar:
- Binding to the view model’s
searchText, so that the view model observes changes to the text. - Binding to the view model’s
isSearching, so that the view model can control the focus/first responder status of the text field. This property is derived from the view model’s state. - Property
showSearchCancelButtonto decide if the cancel button should be shown. This property is also derived from the view model’s state. - Callback function/closure
searchStatusChangedthat lets the search bar notify the view model about events in the search field. When the search bar calls this function we will generate events and send to our state machine.
We now have a pretty complete skeleton of how our search bar should interoperate with our state. This leaves the part of the UI that’s below the search bar, the part where the main content goes. Since this part of the UI changes so much from state to state, we’ve decided to let the different states correspond to different views. We can use the current state to decide which view to draw.
struct ContentView: View {
  @ObservedObject var viewModel: ContentViewModel

  var body: some View {
    return NavigationView {
      VStack(spacing: 0) {
        ...
        self.content
        ...
      }
    }
  }

  private var content: some View {
    switch viewModel.state {
    case .start: return AnyView(StartView())
    case .searching: return AnyView(SearchingView())
    case .loading: return AnyView(LoadingView())
    case .searchResults: return AnyView(SearchResultsView())
    case .error: return AnyView(ErrorView())
    }
  }
}
We wrap all our views in the type eraser AnyView to obfuscate to the compiler that different view types are being rendered here.
This gives us the main skeleton of our application, and now we can take a look at how the state machine is implemented in detail.
State machine
In this sample application, we’ve not used a state machine library. We have implemented states and events as enum cases instead, for simplicity.
class StateMachine {
  enum State {
    case start, searching, loading, searchResults, error
  }
  enum Event {
    case startSearch, cancel, search, success, failure
  }

  private(set) var state: State {
    didSet { stateSubject.send(self.state) }
  }
  private let stateSubject: PassthroughSubject<State, Never>
  let statePublisher: AnyPublisher<State, Never>

  init(state: State) {
    self.state = state
    self.stateSubject = PassthroughSubject<State, Never>()
    self.statePublisher = self.stateSubject.eraseToAnyPublisher()
  }
}
The machine stores the current state in a variable that is read-only, and offers a publisher that notifies any listeners every time the state is changed internally. To let the machine respond to events we will add a function that takes an event and may change the state of the state machine.
extension StateMachine {
  func tryEvent(_ event: Event) {
    if let state = nextState(for: event) {
      self.state = state
    }
  }
}
By using switch statements we can let the compiler help us know that we’ve covered all the possible combinations of states and events.
extension StateMachine {
  private func nextState(for event: Event) -> State? {
    switch state {
    case .start:
      switch event {
      case .startSearch: return .searching
      case .cancel, .search, .success, .failure: return nil
      }
    case .searching: ...
    case .loading: ...
    case .searchResults: ...
    case .error: ...
    }
  }
}
With this implementation, we can get a pretty good overview of how the machine works. It’s also pretty easy to step through this function using the debugger if we’re unsure about some state transitions. The main downside of this type of notation is that it can become pretty verbose when the number of states/events increase. It’s pretty manageable in this case, but we would consider a library or some other implementation of the state transitions that will allow for more ergonomic code if needed.
Side effects
We mentioned earlier that the view model acts as a middleware between the state machine and the view when it comes to observing state. One of the reasons that we’ve chosen to do this is to enable our state changes to have side effects. State machines very often have side effects when either entering or leaving states. To enable this we will add property observers (willSet and didSet) to the view model's state variable and some functions to handle the transitions:
class ContentViewModel {
  ...
  @Published var state: StateMachine.State {
    willSet { leaveState(state) }
    didSet { enterState(state) }
  }
  ...
  func leaveState(_ state: StateMachine.State) {
    if case .searching = state {
      isSearching = false
    }
  }
  func enterState(_ state: StateMachine.State) {
    if case .searching = state {
      isSearching = true
    }
    if case .loading = state {
      search()
    }
  }
}
We set the isSearching property when entering or leaving the searching state. With the help of Combine and SwiftUI this propagates all the way into the SearchBar component and makes the keyboard appear and disappear. Additionally, we also let entering the loading state trigger our network request. In this application we are helped a lot by SwiftUI, Combine and the @ObservedObject property wrapper in the ContentView. By using this property wrapper we get UI changes for free whenever the state of our view model changes. If we had a more traditional UIKit application we would use these state transition functions to also swap out the visible view of our application. The main idea behind this architecture is to let the state machine drive UI changes, and so it’s an essential part to let the machine have side effects.
Wrapping up
We’ve seen how a state machine can help us structure and validate code, and how it helps us get an overview of an application’s flow. This sample application is pretty simple, but it is heavily inspired by a (more complicated) real-world implementation that we’ve worked on for a client. We think it illustrates the point of how a state machine will help us structure code. Adding a state machine may not let you write any less code — or less complicated code for that matter — but we do believe that it helps structure code more to a more understandable format. It helps us gather the logic that has to do with flow and transitions in a centralized place, and it lets us respond to changes in state in a well defined and structured way.
The state machine can also help us if we need to add something or make changes to the way our application works. Since all logic is centralised, we can easily see what effects a particular change will have on our application. Many times we can also get compiler support, for instance by using enum cases as states or events, so that we are sure we haven’t left some combination of state and events unimplemented.
If you want to see the complete implementation of this app you can check out the GitHub repository.